Often systems don’t play nicely together, one system can export files via email and another will only accept SFTP as a method of interacting with it. Bridging these sorts of systems can become challenging and often requires in-house built scripts or multiple software products to daisy chain these systems together.

Couchdrop enables you to bridge and automate file workflows such as this which could solve a challenge as simple as getting new employee information to an employee benefits third party. Couchdrop sits on top of your cloud storage (SharePoint, Google Workspace, Dropbox, etc.) and enables you to ingest files via multiple methods (email, web portal, SFTP, HTTPS) and automatically push files via SFTP, FTP or between cloud providers.
Email ingestion and SFTP
This guide will run through a scenario of ingesting data from email (should a system export files via these means) and then send files to a third-party software that only accepts files via SFTP. For the sake of this guide, we will use Google Shared Drives but this can be used with any compatible storage integration.
The file transfer will follow this path: Email ingestion → Google Shared Drive → Remote SFTP location and use automations to remove the need for manual intervention.
Step 1 — Create a Couchdrop account
First thing first, you need a Couchdrop account. Creating an account only takes a minute and you can try Couchdrop free for 14 days without a credit card.

Step 2 — Configure Google Workspace Shared Drives
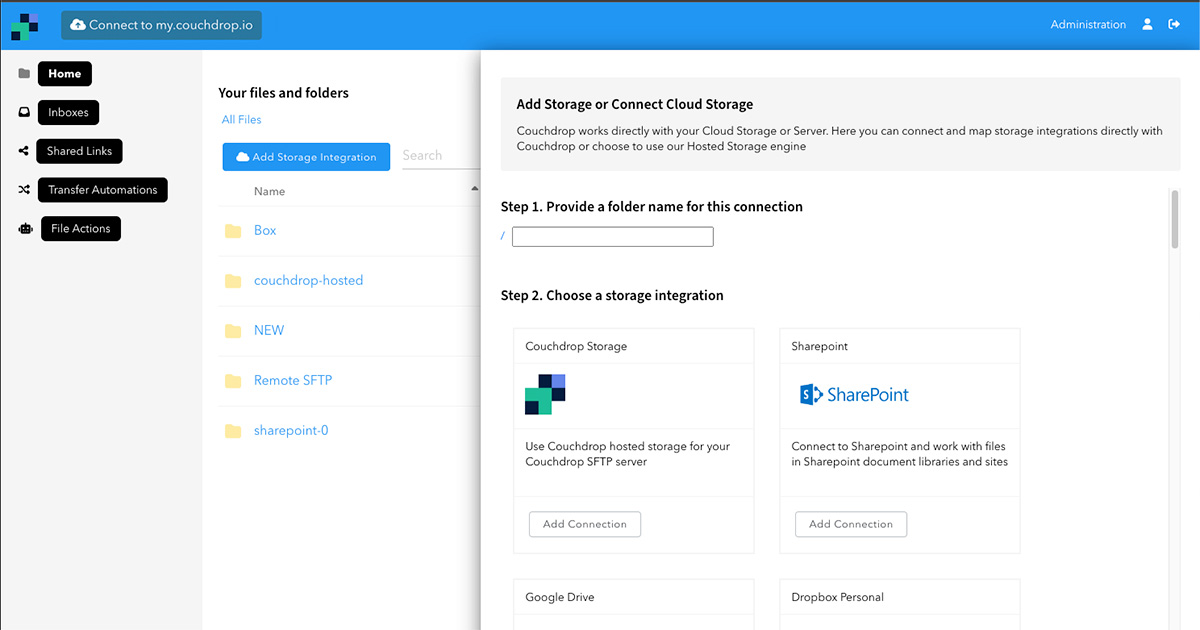
We’ll now configure a Google Workspace Shared Drive as the central repository for data at rest and the location where we will receive files from email and send files to a remote SFTP from. When logged into Couchdrop, click Add Storage Integration and select Google Workspace from the list.
For a detailed guide on connecting Google Workspace, see our Google Workspace connection guide.

Step 3 - Configure email ingestion
Inboxes allow for file ingestion via email or a web upload portal. For this guide we'll use the email Inbox method.
First, navigate to Inboxes and then +Create New Inbox. You'll be guided through the rest of the steps including which folder you wish for files to be sent to. You can configure both a Web Inbox and Email Inbox but we'll be focusing on the Email Inbox for this guide.
At the Email Inbox stage, make sure to Enable email attachments (this is how files will be ingested) and couchdrop will generate a unique Inbox Address in the form of an email. Emailing this address with an attachment will strip the attachment and send it to the folder you configured earlier in this step.

Step 4— Test email ingestion
This part is pretty easy, simply send a test attachment to the email address above and ensure it arrives in your destination storage. You can check this either in your Google Shared Drive itself, or within Couchdrop’s interface.
You can also check Couchdrop's audit log to check if the file arrived. The audit log keeps track of every file transfer no matter what method is used.

Step 5— Configure remote SFTP endpoint
Now that we know the email ingestion is working correctly we will configure the destination SFTP location/system where we are sending the files to for processing.
- Go back to the Couchdrop Home
- Click Add Storage Integration and select SFTP
- Configure the SFTP endpoint with the required information

Step 6 - Configure automated file transfer to bridge systems
As we have both the ingestion method ready to go and the SFTP endpoint, it’s now a case of putting it all together and configuring the sync or file transfer of the file from the Google to the SFTP endpoint.
- Jump to Transfer Automations and click Add Task.
- Provide the automation a name, configure your schedule timing, and select the directory you want to send files from.
- For the Action, you can choose to either Move the file or to Copy the file depending on if you want it in multiple directories.
- Configure notifications if required and review the automation summary to make sure the file will be sent to the SFTP endpoint as expected.
Step 7 - Test and enable the automation
Automations start off by default and need to be enabled. With the automation configured, you can either turn on the Automation (which will take effect once the next trigger condition is met) or Run/Trigger Workflow as a test to have it run immediately and ensure the file we ingested earlier from email is sent to the remote SFTP.
We recommend running the test first to make sure everything is working as expected. Once you've confirmed that the file has successfully arrived as the SFTP endpoint, you can enable the automation and have it perform the action automatically from then on.
Use Couchdrop automations to send to a remote SFTP endpoint
Along with email ingestion, Couchdrop allows for several other methods for ingesting files and transferring them to the SFTP endpoint. Web Inboxes are another method, which allow someone to visit the Inbox URL and upload a file to a configured directory of your storage, which can be the same directory as the email Inbox.
You can also create SFTP users with granular user permissions directly in Couchdrop and isolate them to a specific directory. When the user uploads a file to that directory, the automation can then trigger and send the file to the final SFTP endpoint.
Couchdrop makes secure automated file transfers simple and straightforward. Want to try setting up an automated file transfer yourself? Sign up for your Couchdrop trial now.